Chocolate Cupcakes with Peppermint Frosting

Saturday, December 20, 2008

Merry Christmas! December is definitely a peppermint month and I have been waiting to try this recipe for a while and I have ended up so far making three batches of these. EC likes them a lot, he says the cupcake part is like a cookie version of Oreo cookies and the peppermint frosting combined with crushed candy canes is a nice refreshing topping.

In keeping in the spirit of the holidays, we found a Santa hat and bell cat collar at the dollar store and decided that Petey needed to again be subject to public humiliation at our expense. He was really good about it though, but he was really worried about being on the table, since usually when he gets on the table we squirt him with water. But he calmed down after a bit and I gave him some milk afterwards and he was all around a good sport about it.
.
Chocolate Cupcakes with Peppermint Frosting
.
Ingredients
Cupcakes:
1 cup packed brown sugar
6 tablespoons butter, softened
2 large eggs
1 1/4 cups all-purpose flour (about 5 1/2 ounces)
1/2 cup unsweetened cocoa
1 teaspoon baking powder
1/2 teaspoon baking soda
1/2 teaspoon salt
1/2 cup low-fat buttermilk
1 teaspoon vanilla extract
.
Peppermint Frosting:
2 cups powdered sugar
1/2 cup (4 ounces) tub-style light cream cheese
1/8 teaspoon peppermint extract
16 hard peppermint candies, finely crushed (about 1/3 cup)
.
Preparation
Preheat oven to 350°.
To prepare cupcakes, place brown sugar and butter in a large bowl; beat with a mixer at medium speed 2 minutes or until well blended. Add eggs, 1 at a time, beating well after each addition. Lightly spoon flour into dry measuring cups; level with a knife. Combine flour, cocoa, baking powder, baking soda, and salt in a bowl, stirring well with a whisk. Add flour mixture to sugar mixture alternately with buttermilk, beginning and ending with the flour mixture. Stir in vanilla extract.
Spoon batter into 18 muffin cups lined with paper liners. Bake at 350° for 12 minutes or until cupcakes spring back when touched lightly in the center. Cool in pan 10 minutes on a wire rack; remove from pan. Cool completely on wire rack.
To prepare frosting, combine powdered sugar, cream cheese, and peppermint extract in a bowl, stirring until smooth. Spread about 4 teaspoons frosting on each cupcake; sprinkle evenly with candies.

Marshmallow Crunch Brownies

Thursday, December 18, 2008

My mom makes these rice crispy treats that I think are amazing. The base consists of rice krispies, corn syrup, sugar, and peanut butter and on top is spread melted chocolate and butterscotch chips. Mmmmm. So when I found this recipe which is like my mom's chocolate crispy things ON TOP of a brownie I thought to myself, my arteries are going to love this. So I made them, then read the part of the recipe that said that you should chill these completely before eating and I was sad. When I bake, I like instant gratification, even if it means I burn my tongue. So I waited, and waited, and waited, and then I couldn't wait anymore and cut a little sliver while they were still warm, and HA, jokes on them - they are good warm too! They just don't cut as nicely. These are very rich though (as I am sure you can imagine) so it took EC and me a while to get through the pan. And, he liked them better chilled while I liked them better slightly warm, but either way, make sure you have plenty milk (or other complimentary beverage of your choice) on hand.

.
Marshmallow Crunch Brownies
.
Brownie Ingredients
4 ounces unsweetened chocolate
2/3 cup (1 1/2 sticks) unsalted butter
1 ¼ cups semisweet chocolate chips, divided
1 1/3 cups all-purpose flour
1 tsp baking powder
½ tsp salt
4 large eggs, room temperature
2 cups granulated sugar
2 tsp vanilla extract

Topping Ingredients
7 ounces mini marshmallows
1 ½ cups milk chocolate chips
1 cup Jif peanut butter
1 TBSP unsalted butter
1 ½ cups Rice Krispies

Preparation
Preheat oven to 350F. Grease a 9×13-inch baking pan.
In a medium saucepan, melt the chocolate, butter, and ¾ cup of the semisweet chocolate chips on medium heat. Stir occasionally while melting. Set aside and cool for 5 minutes. In a medium bowl, sift the flour, baking powder, and salt. Set aside. In a large bowl, place the eggs and whisk thoroughly. Add in the sugar and vanilla. Stir the melted ingredients into the egg mixture, mixing well. Stir in the dry sifted ingredients and mix well. Fold in the remaining ½ cup semisweet chocolate chips.
Pour the batter into the prepared pan, and even with a spatula. Bake for 25 to 30 minutes, or until a cake tester inserted into the corner of the pan comes out with moist crumbs.
Remove the brownies from the oven, and immediately sprinkle the marshmallows over them. Return the pan to the oven for 3 more minutes.
While the brownies are baking, place the chocolate chips, peanut butter, and butter in a medium saucepan. Cook over low heat, stirring constantly until melted. Remove from heat, add the cereal,and mix well. Allow this to cool for 3 minutes or so.
Spread the mixture evenly over the marshmallow layer. Refrigerate until chilled before cutting.

Dreidel Cake

Thursday, December 11, 2008

Happy Hanukkah in 10 days! One of my coworkers requested a dreidel cake this year for Hanukkah and I was happy to give it a whirl. And you would not believe the stress these little things caused. I decided the cake would be best a pound cake, since pound cake is a heavy cake which would make it easier to shape. The baking the cake part was easy, I used oversized muffin type tins and all I had to do was shave off the sides to make a dreidel looking cake. The tricky part came when I was trying to decide how to cover the things. First I tried fondant and since the dreidels were so small, that proved to be disastrous for me. So then EC had the brilliant idea of dipping them in chocolate. So we tried that and it seemed to work pretty well, but the chocolate stuck to some places more than others, so EC patiently trimmed it down. He likened it to carving soap when he was a cub scout, which made me thankful for him being a cub scout. Then I piped the Hebrew letters on the sides and while I was trying to move one of them to the fridge to help it set up, it tipped over and landed square on one of the freshly piped white chocolate letters, leaving a mushy mess. So I had to re-pipe the white chocolate letter.
But eventually it got done, and it was worth it because she squealed with delight when I brought it to her. All in a (long) days work!

Red Velvet Cake

Sunday, December 7, 2008

Merry Christmas! Yesterday EC and I were invited by our friends to go and cut down a Christmas Tree. We went and it was so much fun! I have never cut down my own Christmas Tree before, it was slightly an adventure. We still had to pick one out, so we tromped around for a while and picked out a cute little Christmas tree. We got it home and it was slightly too tall for our apartment, so I had to trim it a little to get the star to fit. And then I was going to hang the Christmas ornaments on it that I bought the day after Christmas last year, so I opened up the box, and there were no ornament hooks in with the ornaments. I think that is slightly silly. Who sells ornaments without the hooks? So now I have to wait until tomorrow to go and buy hooks. But we got the lights on and the star, and it looks nice, except lights keep burning out, which then causes half of the strand of lights to go out. Oh the joys of having your own grown up Christmas tree.

I have officially started making Christmas goodies! Today I made Red Velvet Cupcakes, very festive. We sent some with EC as he went out Home Teaching which was slightly worrisome, since I have never tried them before and it is fast Sunday so I had to send them out without a taste test. But I have since tried one and it is A-OK. So here is the recipe!
Red Velvet Cake
Adapted from Mrs. Wilkes’ Boardinghouse Cookbook: Recipes and Recollections from Her Savannah Table by Selma Wilkes

2 eggs
1 1/2 cups sugar
1 1/2 cups vegetable oil
1 tsp white vinegar
2 1/2 cups cake flour
1 tsp baking soda
2 to 3 TBSP cocoa powder
1 cup buttermilk
1 tsp vanilla
5/8 ounce bottle red food coloring

Preheat the oven to 350F. Cream the eggs, sugar, oil and vinegar. Sift the cake flour, baking soda, and cocoa together. Add the flour mixture to the creamed ingredients while beating. Slowly add the buttermilk. While still beating, add the vanilla and the food coloring. Pour into three 8-inch layer pans and bake for about 25 minutes. Press lightly;if the layers are spongy, then the cake is done. Frost the cooled layers, assemble and frost the top and sides. Serves 12 to 14.
.
Velvet Cake Frosting
1(8 ounce) package cream cheese, softened
1/2 cup butter
1 (1 pound) box confectioners sugar
1 cup chopped pecans
1 tsp vanilla extract

Combine the cream cheese and butter and melt over very low heat. Add the sugar, pecans and vanilla and mix well. If the frosting becomes too thick, add a little milk. Frost one 8-inch or 9-inch layer cake.

Steak Gorgonzola Alfredo

Friday, December 5, 2008

Last year for Valentine's Day my parents gave EC and I a gift of going out to a Restaurant on them. There was a price limit, but it was pretty high, so EC and I were pretty excited and decided to try one of the nicer restaurants in town. The restaurant we went to served almost everything and I ordered Steak Gorgonzola Alfredo Pasta. This was my first experience trying such a dish and I loved it! Gorgonzola cheese was something I had never tried before, and combined with alfredo sauce and medium steak, it was divine.

So when I saw a recipe for it on Olive Garden's website, I knew I had to try it. So I did. And I tell you what, the recipe says it serves four, but that must be four people who are football players and eat 10,000 calories in a day. It made so much that we had it for dinner twice and I had it for lunch three times. There was a lot of pasta. EC really liked it, he loved the flavor of the cheese. I am slowly learning that I should not each dishes that I love at restaurants and then go and try to make them at home. It isn't nearly as good for some reason. Here is the recipe. If you want to be ambitious like I was and also make your own alfredo sauce, click here for that recipe.
Steak Gorgonzola Alfredo

Steak Ingredients:
1 boneless top sirloin, 2 1/2 lbs
1 1/2 cups Italian salad dressing
1 T fresh rosemary, chopped
1 T fresh lemon juice

Spinich Gorgonzola Sauce:
16 fl oz alfredo sauce
4 c spinach, chopped
1 c green onion, chopped
3 T gorgonzola cheese, crumbled
1 lb fettuccine, cooked according to package directions
2 T balsamic glaze (I actually don't know what this is)
2 T gorgonzola cheese, crumbled
2 T sun-dried tomatoes, chopped (I couldn't find any of these)

Cut beef into 1" cubes and set aside. Combine salad dressing, rosemary and lemon juice in a large mixing bowl. Add beef pieces to the mixture and let marinate for at least 1 hour.
Heat alfredo sauce in large saute pan. Add green onion, spiniach, and gorgonzola cheese. Stir to thoroughly blend all ingredients.
Grill beef pieces to desired donesness.
Add hot, drained pasta to saute pan with heated sauce. Toss pasta with sauce, then transfer to a large platter. Place grilled beef pieces on bed of pasta. Drizzle beef with balsamic glaze. Sprinkle remaining gorgonzola cheese and sun-drien tomatoes over finished dish.

Pumpkin Whoopie Pies

Tuesday, December 2, 2008

Happy December! I am so happy it is December! I love this time of year, the Christmas music, the shopping, the decorations, the food, all of it! Mostly I am excited to go and see my family and friends over Christmas because that is what the holiday is about to me. The holiday season also brings to mind peppermint things. I think December is definitely a peppermint month, where as October and November are pumpkin months. Fortunately, I made these Pumpkin Whoopie Pies in November, and I am just now getting around to posting them, so I am safe.

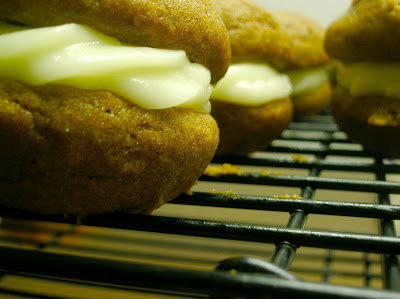
Pumpkin Whoopie Pies, isn't that a funny name? They basically tasted like pumpkin cookies with cream cheese frosting in between. Yumm. They were good, but this recipe made a TON so I gave a pan to one of my friends at work, as rent payment for my plant. It is still thriving, in case you were wondering. They are simple to make, simple to eat, what more could you want from a pumpkin treat (nice rhyming, eh?)?

Pumpkin Whoopie Pies with Cream Cheese Filling
Adapted from Baked: New Frontiers in Baking by Matt Lewis and Renato Poliafito
.
Pumpkin Whoopie Cookies:

3 cups all-purpose flour
1 tsp salt
1 tsp baking soda
1 tsp baking powder
2 TBSP cinnamon
1 tsp ground ginger
½ tsp ground fresh nutmeg
1 cup granulated sugar
1 cup dark brown sugar, firmly packed
1 cup canola oil
3 cups chilled pumpkin puree
2 large eggs
1 tsp vanilla extract

Preheat oven to 350F. Prepare to baking sheets lined with parchment paper.
In a large bowl, whisk together the flour, salt, baking soda, baking powder, and spices. Set aside.In a separate bowl, whisk to sugars and oil together. Add the pumpkin puree and whisk to combine thoroughly. Add the eggs and vanilla and whisk until combined. Sprinkle the flour mixture over the pumpkin mixture and whisk until completely combined.Use a small ice cream scoop with a release mechanism to drop healing TBSP of the dough onto the prepared baking sheets, about 1 inch apart.Bake for 10-12 minutes, until the cookies are just starting to crack on top and a toothpick inserted into the center of a cookie comes out clean. Remove from the oven and let the cookies cool completely on the pan while you make the filling.
.
Cream Cheese Filling

3 cups powdered sugar
½ cup unsalted butter, at room temperature
8 ounces cream cheese, at room temperature
3 TBSP milk
1 tsp vanilla

In the bowl of an electric mixer fitted with a paddle attachment, beat the butter until smooth with no visible lumps. Add the cream cheese an beat until combined.Add the powdered sugar, milk and vanilla and beat until smooth. Be careful no to overbeat the filling, or it will lose structure.

To assemble: Turn half the cooled cookies upside down. Pipe filling (about a TBSP) onto that half. Place another cookie, flat side down, on top of the filling. Press down slightly so that the filling spread to the edges of the cookie. Repeat until all the cookies are used. Put the whoppie pies in the refrigerator for about 30 minutes to firm before serving.